Exhibition Planning

Exhibition Planning

Within the brief it stated that our final pieces had to be exhibition ready, which means we had to have full sized prints, framed and we have to know for definite how we wanted them displayed.

Each of my prints is 8×10 in size and they’re each framed in a medium thickness black wooden frame. I originally had 6 images, so it would have been 3 above and 3 below, but because I had to remove George I changed it to be displayed like this:

exhibition plan

In a way, it worked out slightly better, as it meant I could have the landscape and portrait images together without worrying about having to pick a final portrait image to fit the display.

I want them displayed at roughly eye level so that you don’t have to strain to see the images. I would like the persons eye line to fall in the centre of all 5 images, so that you could see all 5 images equally. Each image would be spaced 3 inches apart, with the top and bottom row being 3 inches apart too.

The reason I have chosen to display them like this is because I wanted them all as separate prints to reflect the notion that everyone has their own separate identity, but as I mentioned in my idea development, identity only becomes relevant when compared to others. This is why they’re next to each other, but still separated.

I have titled my work Ipseity. I originally planned on calling it identity, but I felt that was too simple and didn’t properly reflect my idea. So I put identity into a thesaurus, and it came up with ipseity. Ipseity is defined as not exactly identity and not exactly self, but both and also something between the two meanings; it can also mean nature or self-nature.” I thought this definition was a perfect explanation of my work. For my work I would like to have a contact card underneath my prints which is a short explanation of my project/title:

Exhibition card

Final Images

Final Images

DSC_4793

Libby:

“Jewellery or make up represents my personality.”
“I don’t like my skin.”

DSC_4794

Sophie:

“I do like food.”
“I don’t like that I have to wear my glasses to feel ‘normal’ or ‘myself’.”

DSC_4795

Emily:

“I like that I am Creative/I like writing and books.”
“I have a massive nose and forehead.”

DSC_4796

Suzie:

“My smoking.”
“I don’t like my stomach, but my hair is annoying sometimes too.”

DSC_4798

Tom:

“I hate cleaning”
“I’d say that it’s one thing being good at football and squash, and being able to act and sing, but I really wish I could dance :(“

Damaging Process

Damaging Process

This was the part of my work that I had been really looking forward to, but also the part that I needed to actually create the narrative I’d been aiming for.

I started out by practicing on some 6×4 shots so I could get the technique right for the final images.

All

Each of the images is being damaged according to the person’s answers about their identity.

Emily

Emily’s was damaged with writing as she said she loves writing and books. In addition to this I asked her what her favourite book was and she said “The Lion, the Witch and the Wardrobe” by C.S. Lewis. I needed to test out how would be best to write on the image since I wanted it to be destructive, but also neat enough to read. it also had to be positioned over her face since she said she has “a massive nose and forehead.” I tested out different pens to see which one would write on the odd texture and found that the pen used across her face in the middle was the best one as it was bold enough to be seen and wrote easily on the image itself. I was torn between two quotes from the book, but ended up deciding on “If ever they remembered their life in this world it was as one remembers a dream.” Nothing too long, and sums up the book perfectly. On the actual image there will only be one piece of writing because if I add writing anywhere else other than her face, it won’t represent the truth of her answer.

Libby

Libby’s was damaged with make up as she said either make up or jewellery represent her identity. I needed to test the best type of make up to use for this one since a lot of it wouldn’t stay imprinted on the image. I used liquid eyeliner across her face, but that dried very quickly because of the matt finish on the photos. I tested mascara across her body and added eye shadow over the top to enhance it and this worked rather well as the eye shadow stuck to the mascara, making it bolder. I also tried out regular eye liner with eye shadow over it, however this was a little too thick for my liking and it looked too neat for what I wanted to achieve so I went with the mascara. The damaged area in Libby’s photograph will be the area over her skin as that’s what she said she disliked.

Sophie

Sophie’s image has been damaged with food. This one was a lot easier to create because all I had to do was find a food that would stick to the image. I eventually chose chocolate cake because one of her favourite foods is chocolate cake. It stuck to the image well and meant that also I could position it across her face where it needed to be since she doesn’t like having to wear glasses to feel normal.

Suzie

Suzie’s image was burnt with a lighter since she smokes. This one took a while to do because during the process it was really windy and the image wouldn’t catch fire. Also, we had to burn the back of the image because the ink on the front wouldn’t catch fire. When we burnt the middle, the ink blew up into a bubble then deflated and caught fire. It was a very awesome effect.

Tom

Tom’s was by far the most difficult one out of all of them. I had to damage his legs since his dislike was that he can’t dance, and I thought this image was going to be the easiest, but apparently not. Originally, I was attempting to damage it with alcohol, but the substance wasn’t strong enough to actually change the photo in any way. So I tried nail varnish remover since that has alcohol in it, and that did nothing either. I then tried pure acetone, but all that did was ever so slightly discolour it and it wasn’t even visible in some light. So I then poured Jäger on it as it’s a dark alcohol which I thought would work, but once again it only stained it a little. I tired de-icer with alcohol in it and literally nothing happened. I tried scratching the image with bottle tops from beers, but it didn’t give me the effect I wanted. I tried both wine and raspberry Sourz; but nothing. I tried everything except pure ethanol and that’s only because I couldn’t find any. So at this point I had to rethink Tom’s image. I decided to ask him for something different as it wasn’t working and after a while of thinking he said “I hate cleaning.” That’s when I had the perfect idea to use bleach. I knew bleach would work instantly so I tested it and it worked like a charm.

Overall, despite the issues I had with Tom’s, I’d say what I’ve created are some really good ideas. Now all that’s left is to damage the big ones and I should have my final pieces.

Film Results

Film Results

Having shot my six sets of images I took the photos to be developed at Max Spielmann, because we don’t have a colour processor at the university. It was really risky shooting them on disposable cameras as I couldn’t control any of the settings to make sure my shots came out. So I just had to hope.

Luckily 5/6 films came out, but unfortunately George’s reel was too under exposed to see the images. I was a little disappointed, but I still had to first 5 to work with.

Emily Libby Sophie Suzie Tom George

Overall I was happy with the outcome of the first 5. Since I didn’t have time to reshoot and get my images developed again I decided to just move forward with the ones that worked. On the photos of Suzie there are a few light leaks, but I don’t think they’re due to the camera I shot them on as the rest of the film doesn’t have them on, so I’m guessing it occurred when the shop processed my film. I’m not so bothered about it though because my aim is to damage/distort the film anyway. My models did a brilliant job and now I have a clear idea of how I want to alter them.

I really enjoyed using disposable cameras for these images. It meant I was less focused on the technical side of what I was shooting and more focused on capturing the narrative within my shots. I think despite the fact that I didn’t alter the cameras in any way, the method was still the right one to use. Thinking back on it, I would have liked to experiment with the cameras as well as the film, so I think I will endeavour to do that in future. It was interesting shooting on colour as well, since I’m used to capturing black and white images, and I loved the results I got of this off green colour to them all. I don’t know whether that was to do with the brand of film or whether all disposable cameras come out that way, but I like it nonetheless. I’m looking forward to damaging these and seeing what results I get.

Shoot Logistics

Shoot Logistics

  Having conducted my research, I felt it was time I sorted out the logistics of how I wanted to shoot my images.

First: Locations

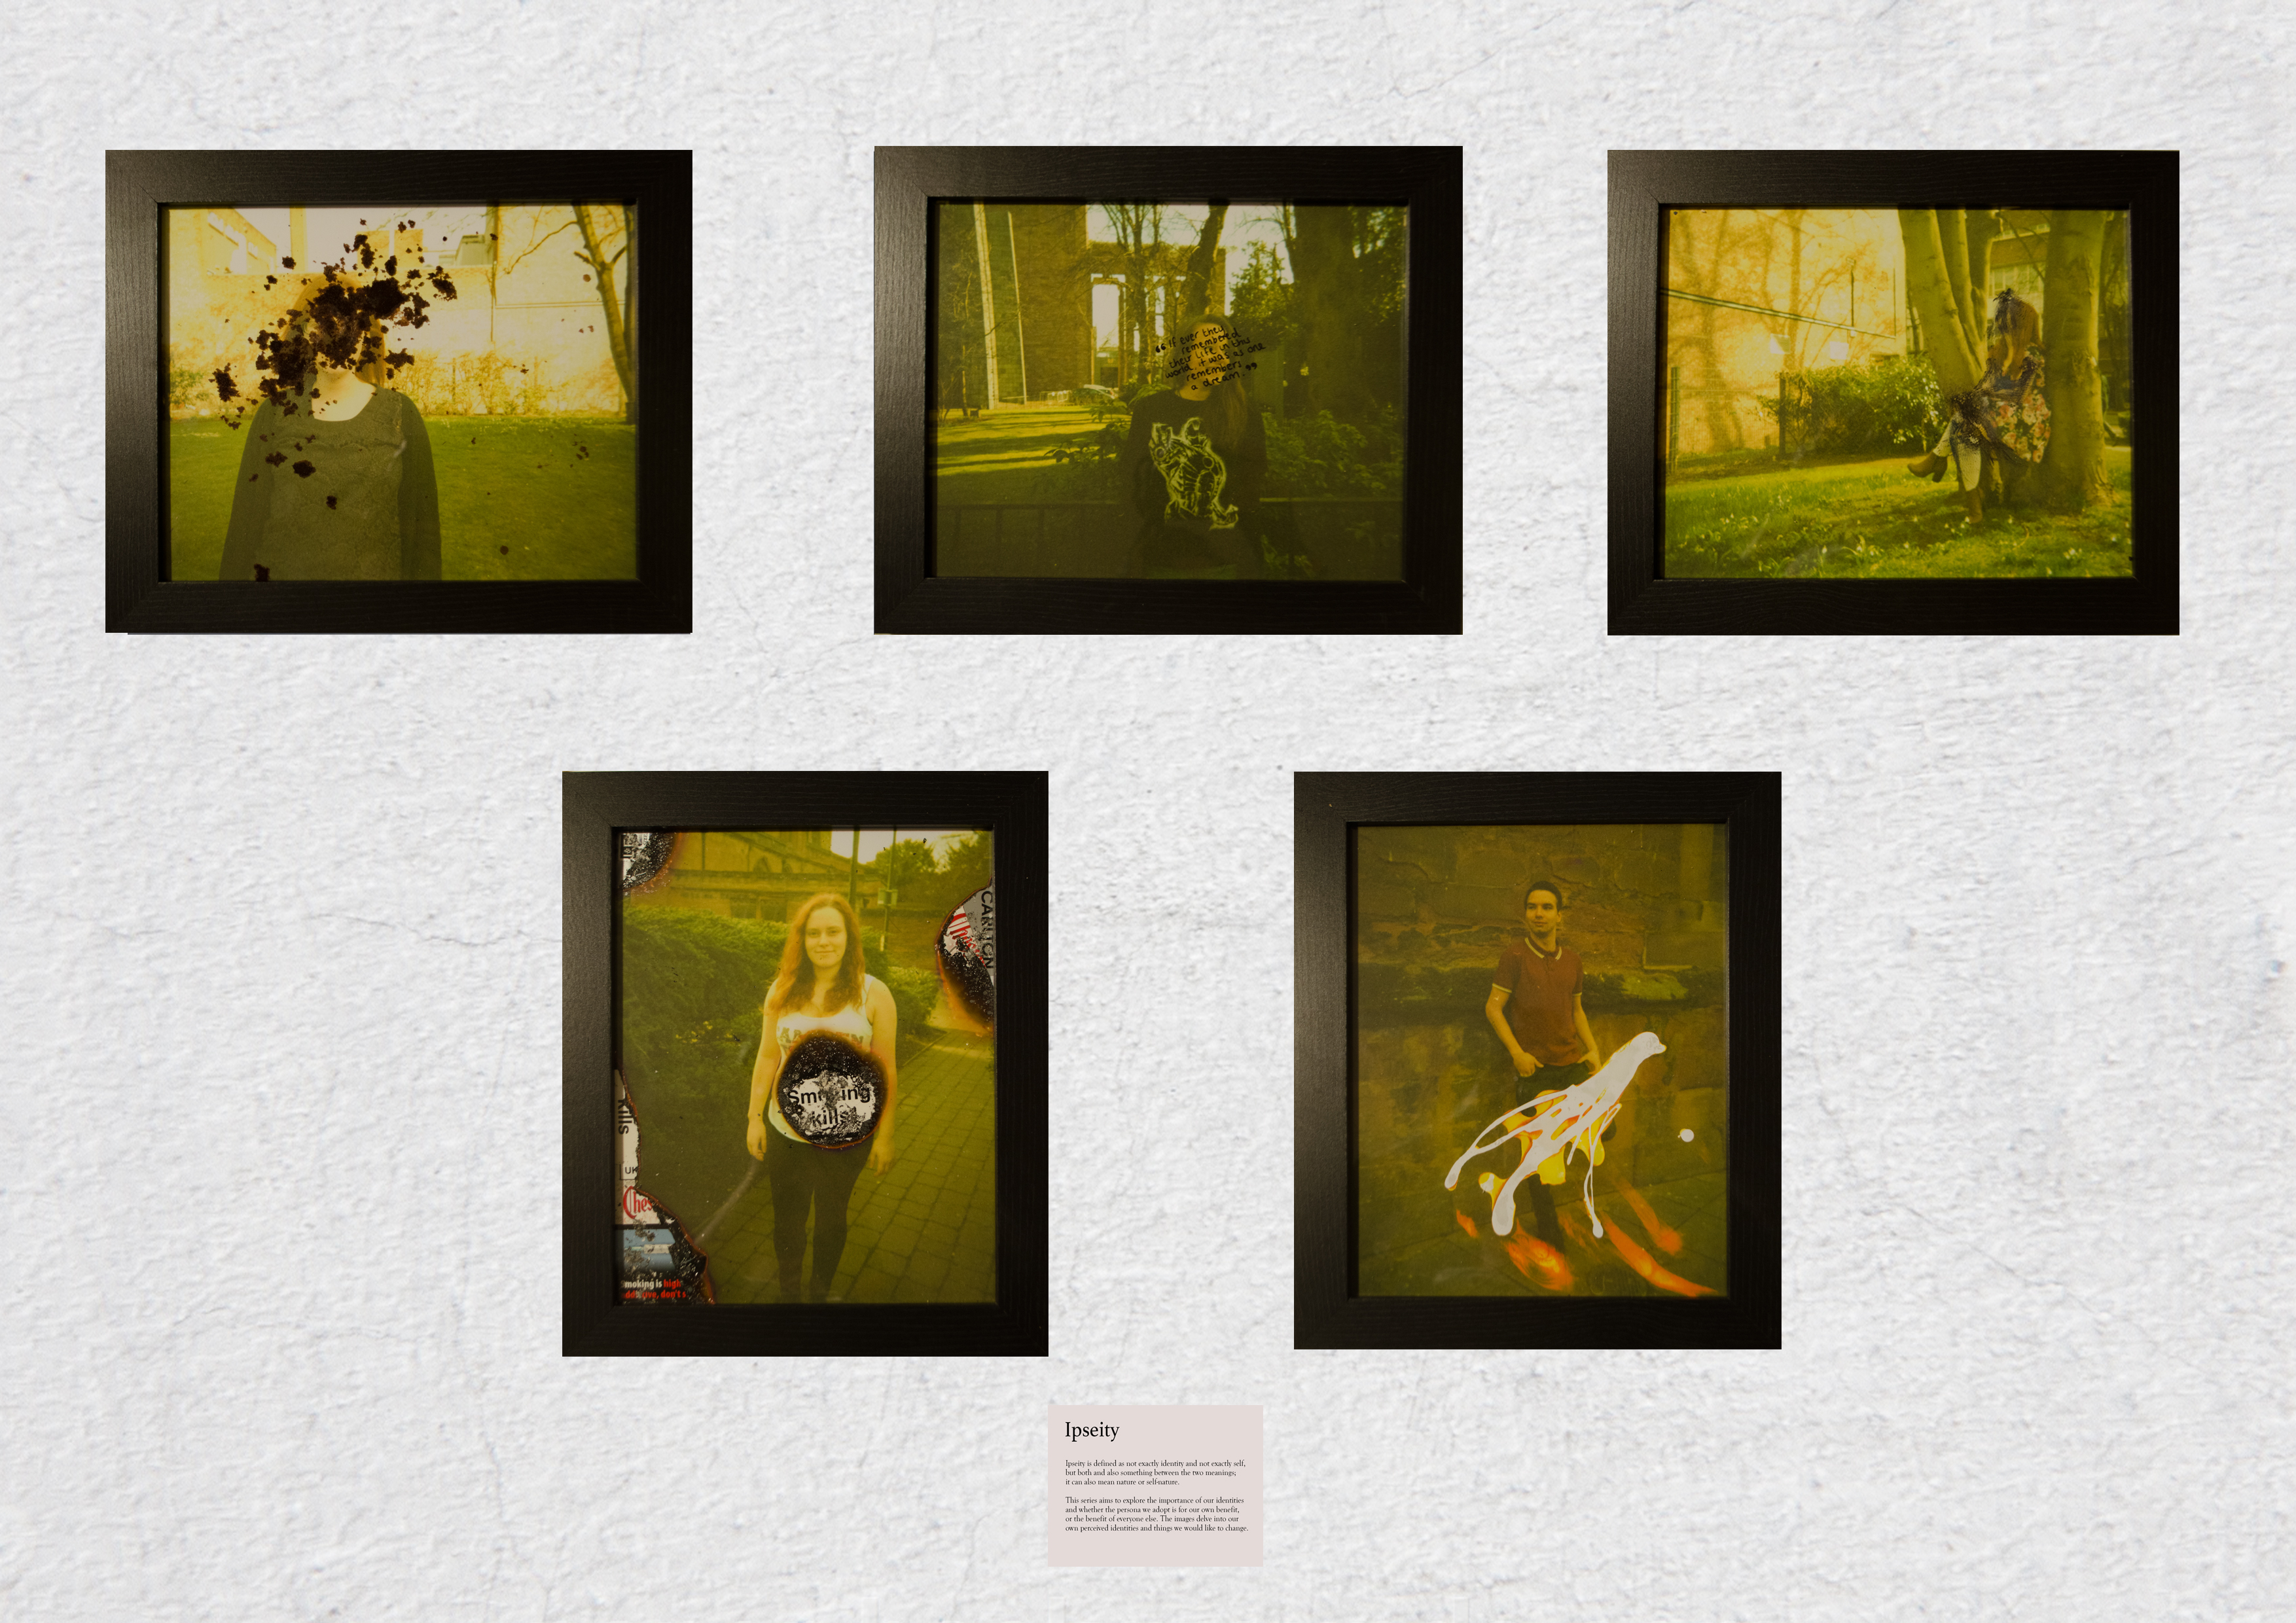
The location of where to shoot was important to me. I didn’t want it to look too recognisable as Coventry City Centre and I struggled to find somewhere outside of Coventry that I could shoot and get all my models to with ease. So I was left to try and find a few locations in Coventry that I could disguise as else where to the untrained eye. I knew it needed to be outside too, since I wanted them to be in a public setting in order to portray the identity they adopt when in such a situation.

I decided on three locations in the end:

Location 1: Hill Street.

Location 1

The small patch of green at the bottom of Hill street seemed like the perfect secluded area to shoot a few people. There were a couple of angles I was able to make use of and I think I managed to shoot the images so none of them looked similar.

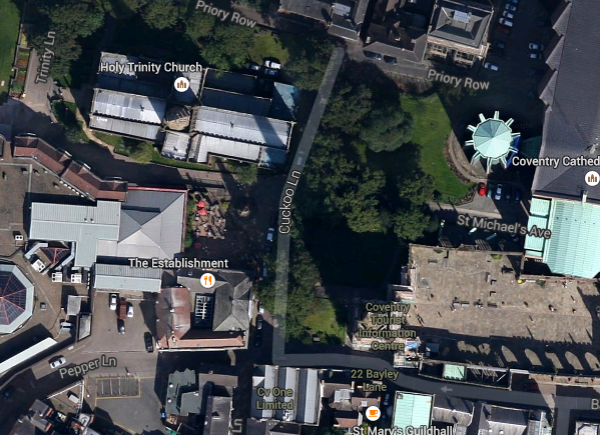
Location 2: Priory St.

Location 2

This location was a little harder because I had the university square to contend with in the backdrop, so I had to stick to framing away from the university buildings. It was harder than the first location as there was less space to work with that wasn’t recognisable, but I think I managed to make it work.

Location 3: Cathedral lanes.

Location 3

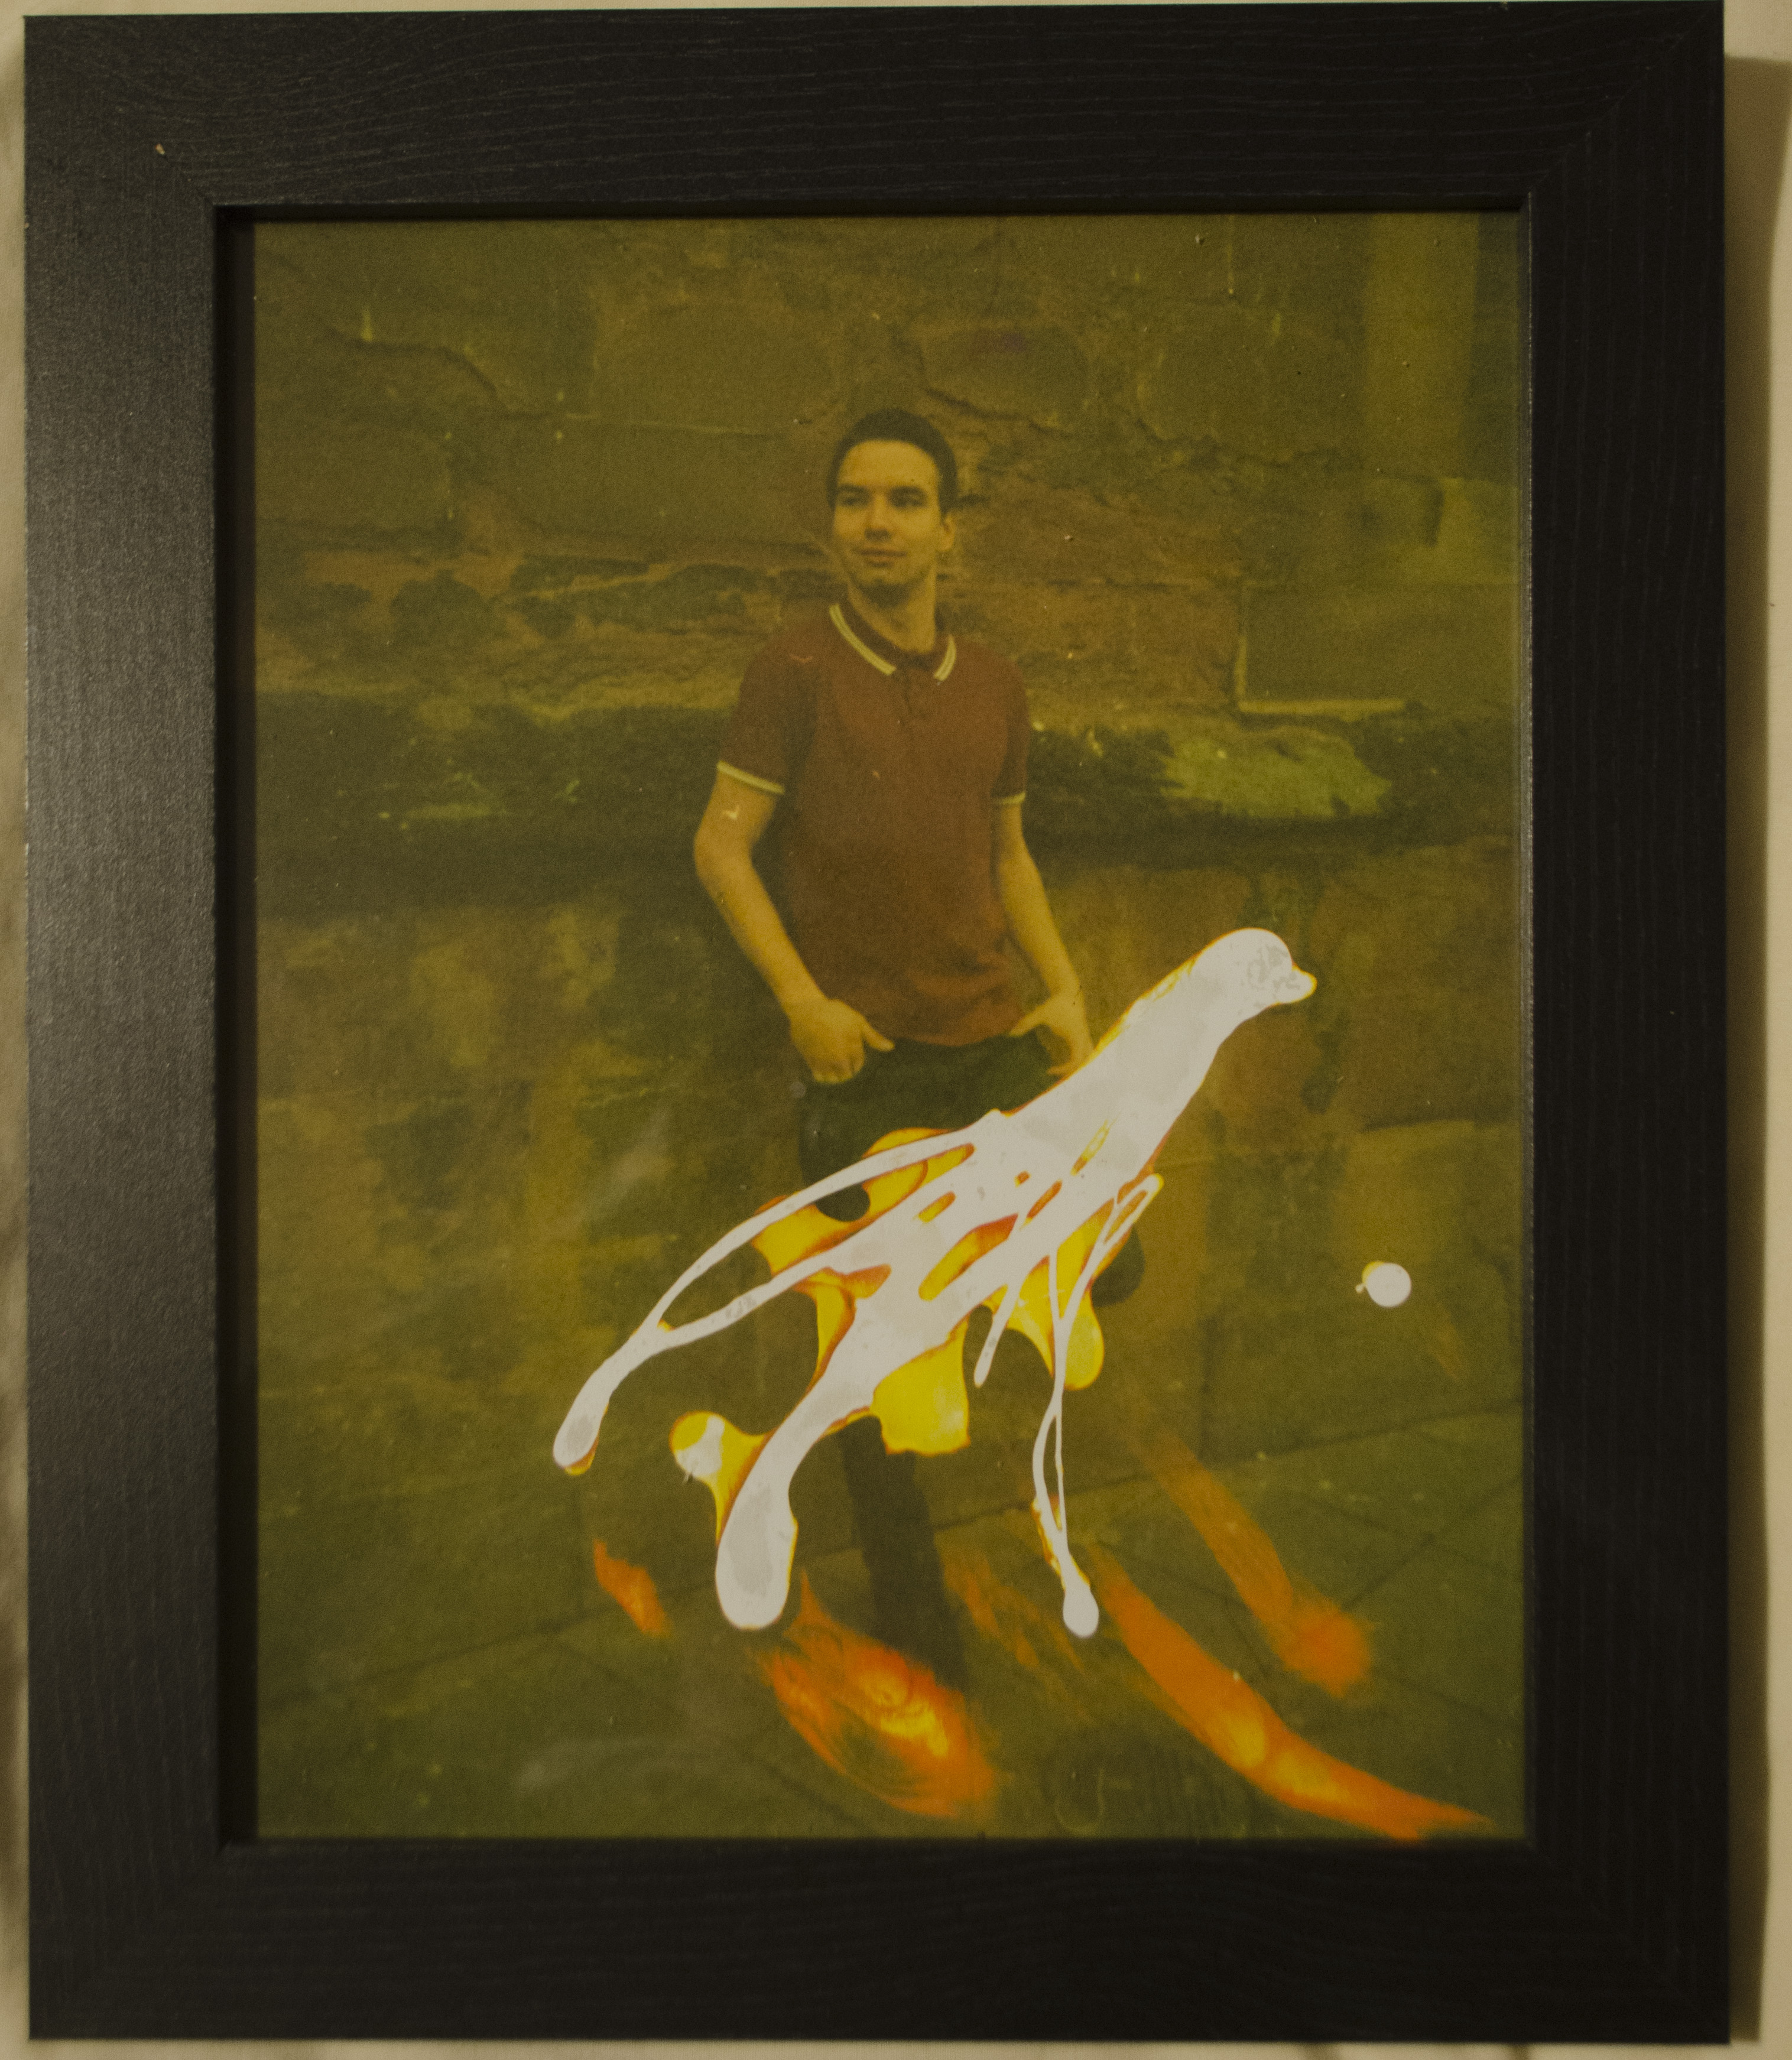
I decided to shoot on the cobblestone lane between Godiva Square and the Cathedral because it was quieter, had the sort of backdrop I wanted, and I was able to pick a few different positions for shooting as there wasn’t so much that is recognisable in that area.

Second: Reasoning/Method

The second issue I had to sort out was how I wanted to shoot each person. For my preparation I asked each of my 6 models to tell me something physical that they felt represented their identity, as well as something they disliked about themselves. I got quite a range of responses.

Libby:

“Jewellery or make up represents my personality.”
“I don’t like my skin.”

Tom:

“I go out drinking an awful lot, so I guess alcohol?”
“I’d say that it’s one thing being good at football and squash, and being able to act and sing, but I really wish I could dance :(“

Suzie:

“My smoking.”
“I don’t like my stomach, but my hair is annoying sometimes too.”

Sophie:

“I do like food.”
“I don’t like that I have to wear my glasses to feel ‘normal’ or ‘myself’.”

George:

“My lighter maybe? It’s been awhile since I’ve brought it and used it.”
“Anxiousness. This. I want to get rid of this! And my spaghetti arms.”

Emily:

“I like that I am Creative/I like writing and books.”
“I have a massive nose and forehead.”

I found it really interesting the answers I got, as some people really struggled to come up with something that represented themselves, and easy to come up with a dislike, where as for some of them, it was the other way round. However, the answers they gave me were really helpful in working out how to shoot them all. For example, Sophie I will shoot closer to her face as her focus area is her glasses, whereas for Tom, it’ll be his whole body, since in dancing you use your whole body. It also works out well at giving me a range of options for the final images so they don’t all look too similar.

Now that I’ve worked these kinks out of my planning, I will be able to shoot much easier. One final thing I found though that has inspired my production of my idea was this quote:

“There is a certain way of being human that is my way. I am called upon to live my life in this way, and not in imitation of anyone else’s. But this gives a new importance to being true to myself. If I am not, I miss the point of my life, I miss what being human is for me. […] Being true to myself means being true to my own originality, and that is something only I can articulate and discover. In articulating it, I am also defining myself. I am realising a potentiality that is properly my own.” – Charles Taylor.
I felt it really captured what I’m trying to portray throughout my project and I will definitely keep it in mind when shooting and processing my images in post, as it will hopefully inspire me to create high quality images.
Seba Kurtis

Seba Kurtis

Another artist that I chose to look at in relation to my project was Seba Kurtis. I found some really interesting projects on his website, but the one that stood out the most to me was his series Drowned. He shot images on film and then proceeded to drown the box of film in the ocean. His explanation of the project is as follows:Screen Shot 2015-03-02 at 12.06.30 am

This is exactly the kind of situational destruction that I want to incorporate into my own images. I want to use the theme of identity to merge with my process of production and Kurtis’ images demonstrate that perfectly.

33_3 33_7 33_10 33_11

What I really like about his images is that the destruction/manipulation of them is incredibly subtle. You have to look a bit harder to see what’s been changed and it doesn’t overdo it or ruin the original images. It makes them slightly more surreal, but also calming in a way as the colours are softer than you would expect. I think it works though as the pictures are fairly serene and the overall final images match really well with how he’s created them and the original inspiration for it.

I’m definitely going to use his pieces to inspire my own work, as they are a combination of the process and idea that I want to adopt with my images. I think I want to create something that has slightly more obvious damaging techniques, but his methods are also there as a back up if I decide they’re too far away from the theme.

Damaging Techniques – Thomas Anderson

Damaging Techniques – Thomas Anderson

While investigating techniques to alter disposable cameras, I came across a featured artist on the Top 20 camera hacks page called Thomas Anderson.

The link featured on the page took you to a set of his images he took on a disposable camera which he then threw it into a swimming pool.

2796927325_b353953995_o 2796938477_8362591c5a_o 2797774400_5c9d1cc1fb_o 2797781948_3c6dccd967_o

The resulting images created blends of numerous colours which gave them a really surreal look. The dots throughout the film make them look almost like miniature galaxies. I’m really intrigued to know what happened to the second image to create such a result, but unfortunately the link on his flickr page to his blog is broken and so I know nothing about the actual process of these images.

However, I began searching through his flickr and found that he had a lot more albums with damaged photos that have all been damaged in different ways.

Caffenol:

4070620885_772f6b78ce_o

Exfoliated:

3092834605_b573a20b00_o

Denaturalised Alcohol:

2246147536_7cf4c3f984_o

Bleach:

2208796336_f6f06c93fc_o

Shower Cleaner:

2228096486_e90c561b23_o

Aftershave:

2121712787_98de8e57fb_o

Boiled:

2120133642_4a68e8b0ba_o

Lemon Juice:

2151761089_a87fa9478c_o

Finding Anderson’s images gave me a great starting point for my own ideas. It was really helpful to see someone else’s work who had experimented with loads of different things. But also, the majority of these images were in a photo set called “damaged” on flickr, which is a group dedicated purely to shots made with damaged or by damaging film. It was really helpful in giving me loads of other ideas as well as these. Despite this being massively helpful though, I want to make mine slightly differently, in that I’ll be using elements that people associate with their identities to destroy the film. So instead of just generally using chemicals or techniques, I’ll be specifically destroying each piece of film in a way that’s linked the person in the photographs.

Disposable Cameras

Disposable Cameras

Along with my artist research I need to research into the physical processes I have decided to use. I decided right at the beginning of the project that I wanted to shoot on disposable cameras. So I ordered 6 disposable cameras from ebay for £20 (which annoyingly is the cheapest I could find anywhere!)

IMG_6418

Since knew from the beginning that I wanted to shoot like this it means I also knew what I wanted to research. I chose to research ways in which you can alter disposable cameras to change the resulting picture. I looked at many different websites and articles and found some really interesting experiments:

1. Using Outdated Film

Screen Shot 2015-03-01 at 2.02.52 pm

Shooting on outdated film will give you interesting colour results, but finding a disposable camera that is outdated is VERY difficult. I could barely find a disposable camera to begin with, let alone one with outdated film. And because I wasn’t shooting on an SLR I couldn’t buy outdated film and load it in to shoot with. So sadly this option was made redundant.

I then came across an article called Top 20 Ultimate Ways to Use a Disposable Camera which had some really good experimental methods.

2. Double Exposures

Smacking a disposable camera on your hand will sometimes trigger the flash and therefore the shutter without you having to wind on the film; resulting in a double exposure.

3. Flash Filters

You can create make shift flash filters by taping pieces of coloured cellophane over the flash. It gives some really interesting colour results, but doesn’t completely colour the entire photo. It just adds hints of specific colours.

4. Lens Filters

These on the other hand will tint your entire photo. You put them over the lens so it alters the colour reception on the film and turns the entire image one colour.

bluefilter1

5. Damaging Film

During this research was when I first came up with the idea to damage my prints. I really liked the idea of damaging the film after it had been produced. There are so many ways you can damage film after it has been developed and it appealed to me more than damaging/altering the cameras.

6. Damaging the Lens

You can also damage the lens by scratching it in order to get a kind of vignette effect on your images.

I found a question on Yahoo Answers which gave me a few more techniques:

7. Light Leaks

Light leaks are really effective when done properly. If you attempt to create light leaks though it’s a very experimental process since too much light will completely over-expose your images, and not enough will mean the effect doesn’t show.

8. Water Damage

Submerging the cameras in water can create anything from between little specks on the film, to complete alteration of the images.

I searched through several other websites, but the majority of them were just repeating the methods that I’d already found. It gave me some really interesting ideas and I decided to go with the damaging the film. As much as altering the disposable cameras would be really interesting, for my overall idea it works better to damage the film in post since it gives me more control over which parts of the film are damaged/altered and it means I can portray my idea much clearer. So I’m going to move forward with this in mind, shoot normally then alter the film after it has been processed.

Giuseppe Mastromatteo

Giuseppe Mastromatteo

Continuing my research into photographers that explore identity brought me to Giuseppe Mastromatteo. In his series Indepensense 2009 he explored the notion of identity by using manipulation to create illusion type images. He takes nudes of his subjects and creates new elements within the images that portray the idea that there are parts of their identity they wish to replace, hide behind, or destroy.

i02_2009 i03_2009 i04_2009

His creations of people with masks of their own faces is representative of the idea that no matter how open we are, we still have something we want to hide behind. Everyone might think you’re being 100% honest about who you are, but everyone has secrets and things that they wish to keep private about their lives. What I like about these images is the slightly off colour of each of the masks compared to their actual skin tone. It’s just enough to make you realise there’s a difference between their real selves and their masks, but it’s not too obvious. I interpreted this as similar to real life. Sometimes you have to look a lot closer to recognise when someone isn’t being true to themselves. It also makes their faces look incredibly fake and doll like, which is creepy in itself, but it just adds to the lack of authenticity that he is presenting through their fake identities.

i17_2009 i18_2009 i19_2009

His second set of images above, portraying people tearing up paper versions of their own faces, feels to me like he’s toying with the idea of not liking your identity. It’s obvious that they’re all holding replicas of their own image, but when they are torn apart, it’s as if they’re actually tearing into their true selves. I suppose this could be attributed to real life as well, with the idea that destroying some people’s outer identity also tears away at their inner selves. Some people might feel that all they have is a facade to keep things going, especially when things get hard, and if this gets questioned or something happens to test that facade, then it might end up damaging the person underneath. It could also represent that people’s identities are as flimsy as a piece of paper, and that we are all destructible and interchangeable at any time, so we shouldn’t feel trapped in this social construct of ‘identity.’

This is going to be a really good series to use as inspiration for my project, since I can use the literal element of destroying images of yourself to destroy your identity, and also use the metaphorical meaning of hiding behind something or disliking the way you are. I like the aesthetic of his images, but I want mine to be less forced and more like I’m observing the person within a natural environment that would bring about their selected personality. I will probably shoot in public as opposed to in a studio in an attempt to create this idea, since in public is when people mostly tend to alter their identities to fit whatever ideals they think society holds for them.